
ရီတာမရပ္လိုက္ပါနဲ႔။
IMM ကိုလြန္ခဲ႔တဲ႔ ၁ႏွစ္ေလာက္က သြားတုန္းက အျပင္ဘက္ ပိစိပစိ ေတြေရာင္းတဲ႔ဆိုင္ေလး တစ္ခုမွာေတြ႔လိုက္ရတဲ႔ ဆိုဒ္ပုဒ္ ေလးပါ။ သေဘာက်လို႔ ဖုန္းကင္မရာနဲ႔ ရိုက္ယူလာခဲ႔ပါတယ္။
သံေ၀ဂပဲ ရရမလား ၊ ဘယ္လိုေျပာမလဲ.. တစ္ခုခုေလးကြ်န္ေတာ္႔ က်န္ခဲ႔တယ္။


Medium format has traditionally referred to a film format in still photography and the related cameras and equipment that use this film. Generally, the term applies to film and digital cameras that record images on media larger than the 24 by 36 mm of 135 film, but smaller than the 4 by 5 in (10 by 12.7 cm) size, which is considered to be large format.
In digital photography, medium format refers either to cameras adapted from medium format film photography uses, or to cameras making use of sensors larger than that of a 35 mm film frame. Often, medium format film cameras can be fitted with digital camera backs, converting them to digital cameras, but some of these digital backs, especially early models, use sensors smaller than a 35 mm film frame. As of 2006, medium format digital photography sensors were available in sizes of up to 36 by 48 mm, with 39 million pixels for use with commonly available professional medium format cameras. Sensors used in special applications such as spy satellites can be even larger, but are not necessarily described as medium format equipment.
In the film world, medium format has moved from being the most widely used film size (1890s through 1950s) to a niche used by many professionals and some amateur enthusiasts, but one which is still substantially more popular than large format. In digital, medium format is a very expensive option, with typical brand new all-digital medium format cameras retailing for $10,000 (Mamiya ZD) to $32,000 (Hasselblad H3D) in 2008, though, older and used equipment can be substantially cheaper.
While at one time or another a variety of medium format film sizes were produced, today the vast majority of medium format film is produced in the 6 cm 120 and 220 sizes. Other sizes are mainly produced for use in antique cameras, and many people assume 120/220 film when the term medium format is used.
The general rule with consumer cameras — as opposed to specialized industrial, scientific, and military equipment — is the more cameras sold, the more sophisticated the automation features available. Medium format cameras made since the 1950s are generally less automated than smaller cameras made at the same time, having high image quality as their primary advantage. For example, autofocus became available in consumer 35 mm cameras in 1977, but did not reach medium format until the late 1990s, and has never been available in a consumer large format camera.
Compared to 35 mm, the main drawbacks are accessibility and price. While 35-mm cameras, film, and photo finishing services are generally widely available and cheap, medium format is usually limited to professional photography shops and can be prohibitively expensive. Also, medium format cameras tend to be bulkier than their 35mm counterpart.
Most large format film is sheet film, that is, film where each picture is on a separate piece of film, requiring that the camera be frequently reloaded, usually after every picture, sometimes using magazines of up to five pictures or reduction backs that allow multiple pictures on a single sheet of film. Medium format sheet film was produced for some cameras, but these cameras tend to be smaller, lighter, and easier to use than large format gear. Sheet film was never commonly used in cameras smaller than medium format.
Film cost per exposure is directly related to the amount of film used, thus, the larger the film size, the more expensive each picture will be. An 8"×10" large format negative is far more expensive than a 6×6 cm medium format picture, which is substantially more expensive than a frame of 35 mm film.
35 mm cartridges are generally easier to load and unload from a camera than medium format rolls. A 35 mm cartridge is placed inside a camera, and in most motorized cameras this is all that is needed; the camera loads the film, and rewinds it into the cartridge for removal. Far fewer medium format cameras are motorized, and medium format roll film does not have sprocket holes, so loading often requires that marking on the backing paper of the film be lined up with markings on the camera, and on unloading, the backing paper must be carefully secured to protect the film from light.
Digital photography came to the medium format world with the development of digital camera backs, which can be fitted to many system cameras. Digital backs are a type of camera back that have electronic sensors in them, effectively converting a camera into a digital camera. These backs are used predominantly by professional photographers. As with film, due to the increased size of the imaging chip (up to twice that of a 35 mm film frame, and thus as much as 40 times the size of the chip in a typical pocket point-and-shoot camera) they deliver more pixels than consumer-grade cameras, and have lower noise. Features like fan cooling also improve the image quality of studio models.
This market began in 1992 when Leaf Systems Inc. released their first digital camera back, named, fittingly enough, the "DCB" (often described as 'a brick'). Initially mounted on Sinar Studio cameras, the camera backs were later moved to medium format units. By the late 1990s, a number of companies produced digital camera backs of various types.
In the 2000s, the number of vendors of both high-end medium format camera systems and digital backs began to decrease. The performance of digital SLRs cut into the sale of film-based medium format systems, while the tremendous development expenses for medium format digital systems meant that not all vendors could profitably compete. Contax and Bronica ceased production of cameras, Kodak stopped making their DCS series of backs, and camera and back manufacturers began to integrate.
Camera maker Hasselblad merged with digital imaging firm Imacon and partnered with Fuji to design and produce a new line of digital-friendly medium format cameras, the H-Series. Since the manufacturer plans to sell digital backs integrated with the camera, other makers of digital backs are far less likely to be able to sell backs for this camera. This partnership is the clear market leader.[citation needed]
Camera maker Mamiya has developed the Mamiya ZD back, but also announced a partnership with back maker Phase One. Camera maker Sinar was taken over in stages by the digital camera back manufacturer and developer Jenoptik, and partnered with Rollei for the development of the Hy6 medium format camera systems.
The Leaf Aptus 75S digital back offers 33MP resolution, with a shooting speed of 50 frames a minute. In early 2006 Hasselblad (H2D and H3D) and Phase One (P45) released a 39 megapixel back. In 2008, Phase One announced the P65+, a 60 megapixel back, the highest resolution single-shot digital back to date. Phase One continues to dominate high end non-interpolated imaging with the largest market share. Sinar continues to provide its primary Digital View Camera system while still supporting the HY6 medium format with a new platform independent eSprit 65 LV digital camera back. On 20 September 2010, Leaf released a 80MP digital back, the Aptus-II 12. [1]
Available since December 2010, Pentax 645D is 40 megapixel medium format DSLR. The camera has 44x33mm image sensor and the raw file is in DNG format. It is the first digital version of the company's 645 medium format camera system and it is compatible with the existing 645 system lenses.[2][3]
While most professional medium format cameras are very expensive, some inexpensive plastic imports, such as the Chinese Diana and Holga, are gaining in popularity, particularly with toy camera enthusiasts. Many of these cameras are sold through the Austrian Lomographische AG. Due to the poor quality of the cameras, the exact image captured on the negative is somewhat random in nature. These cameras often have plastic lenses that offer poor or uneven focus, light leaks that oddly colorize an image, extreme vignetting, and a multitude of other "flaws" that are generally undesirable to photographers. While these elements certainly are "flaws" in camera design, they can produce interesting, artistic, or enjoyable results. Because of the popularity of lomography and toy camera culture, medium-format photography has seen a resurgence with amateur photographers. Lomography detractors point out that twin-lens reflex cameras (TLRs) and folders without the distortion and light leaks can be purchased on the used market in the same price range.
The Chinese Seagull TLR and medium-format cameras from the former Soviet Union such as the Russian Lubitel and somewhat better made Ukrainian Kiev-Arsenal 60 and 88 are also available at moderate prices. These cameras can deliver quality images, although the lenses and camera bodies are not at the level of those from Swedish, German, and Japanese manufacturers.
Used folding cameras, TLRs, and box cameras are also a cheap option to shoot medium format. Many U.S.-made folders, including most of the mass produced Kodak folders use the discontinued 620 film requiring the user to respool 120 film or modify the film spool to fit.
 It’s amazing at all the different types of people and professions who need headshots; realtors, editors, authors, entertainers, models, CEOs, dancers, moguls, rock stars, travel agents, ministers, entrepreneurs, business owners, internet marketers and even the occasional porn star, just to name a few. Being able to shoot reliable, polished headshots can bring in infusions of cash, and hey, who doesn’t like a little infusion, from time to time?
For this tutorial, I will focus on the ‘classic’ headshot.
Beautiful headshots can be produced with three lights and a reflector.

You will need a key light, a background light and a hair light. The most important light, in my opinion, is the hair light. Hair, especially dark hair, soaks up an incredible amount of light and doesn’t bounce back much. This can leave the photograph looking dull and ‘dead’. The effects of a hair light can be subtle, but it can really bring life to an image, just like catch lights do in the eyes. Look at the difference it makes in these two images.

Just as the lack of a hair light leaves an image looking unfinished, a badly placed hair light can ruin an image. It is very important to make sure the light is placed well to the back of your subject’s forehead. Make sure the light is hitting from the midpoint of the head and falling off to the back. If you position the hair light too far forward, you risk racoon eyes and a glowing nose. Not pretty. You will have to play around with light settings and height, which will be different for brunettes and blonds. I usually find a height of about 3 feet above my subject is best and a setting of f/4.5 or f/5.6. If you’re not careful with blondes, you’ll blow out the top of their heads.

Place your background light as close to the background as possible, with the light aimed almost, but not quite, straight up. You’ll want to make sure it is somewhat lower than your subject. I usually put mine about 3 feet off the ground. I do not use a light modifier, instead I use a standard pan reflector to direct the light. I usually set my background light a stop under my key light and this gives a very nice gradient behind the subject. Background lights help separate the subject from the background and give dimensionality to the image.
Place you key light, preferably in a VERY large umbrella, almost directly in front of and well above your subject. You will bounce the light into the umbrella, NOT shoot through it.
Place a large white or silver reflector at a 45 degree angle directly under the subjects face, low enough not to be in the photo. This will bounce fill light under the subject’s chin and cure a myriad of ills, such as double chins and soft jawlines. It also adds an extra little ‘kick’ of liveliness to the image.
Place yourself slightly higher than the subject aiming down. Shoot with longer focal length lenses, in the 85-150mm range. I prefer to shoot against either a dark gray or black background. And there you have it – the basic headshot.
Source: http://www.studioonashoestring.com/854/studio-lighting-for-headshots-tutorial/

Portrait of swedish actress Nina Zanjani. All the red household objects go well with the warm light from the lamp. The key light is from the strobe though.

Diagram for on location portrait lighting setup
Here is a great portrait lighting setup from New York based photographer Mattias Olsson. All you need is one strobe and a white wall to bounce the light.

The reflector really gives a lot of light. Perfect for outdoor fashion photography.

Lighting diagram for outdoor fashion photography, using a single reflector.
Norwegian photographer Eivind Røhne tells us about about this fashion photography lighting:
As a fashion photographer shooting a lot of stuff outdoors, I often prefer to use the soft light in the shadows. And my clients as well. Then we shape and tweak the light to get it how we want it to look. We use reflectors, speedlights or mobile studio lighting kits. Or maybe all of them. But sometimes we want a different look and feel to the fashion photographs we make.
This fashion magazine client of mine often likes to have a white clothing series in their editorials every year. And this white stuff we like to do in direct sunlight. This time it was on a beach in Sardegna/Sardinia in Italy. We shot a complete editorial quite fast during what usually is considered lunch time; harsh sunlight with lots of shadows. Fortunately we didn’t have a clear blue sky, but we got some clouds that gave us a little bit of texture in the background.
I immediately saw that this could be a cool before and after picture because of the tremendous effect of the reflector. So I asked the editor of the magazine, Mary-Ann – also known as “The Grey Card Lady”, to just tilt the reflector away on one of the shots. She’s a wonderful lady, and did what I asked without asking why, and then we kept on shooting. She was holding a 1×2 meter California Sunbounce half silver/gold reflector a couple of meters away from the model, directing the harsh sunlight back towards the model. And as you can see, a reflector this size can literally light up the whole place. The light was so intense that even the professional model had a hard time looking in its direction for too long without short breaks.
I had taken a few test shots as well as a reading with my Sekonic handheld meter, to get the exposure right so that I would still have some texture in the sky, and a perfect exposure on the models skin and white clothes. Being careful not to lose those whites! Both of these shots here where shot at f/8 and 1/100 second and ISO 50 on a medium format digital Hasselblad with a 210mm lens.
Amazing what a single reflector can do to light up your life!
Cheers!
Source: http://lightingforphoto.com/page/2/

Food Photography ဆိုတဲ႔ အစားအေသာက္အလွပံုေတြကို ဘယ္လိုလွေအာင္ရိုက္ၾကမလဲလို႔
ကြ်န္ေတာ္လိုက္ရွာျပီး စုစည္းမိလိုက္ပါတယ္။ လြယ္လဲလြယ္ကူမယ္ လူတိုင္းလဲ ကင္မရာအေသးေလး ေတြနဲ႔ ပါ ပံံုလွလွေလးေတြ ထြက္ေအာင္ ရိုက္ဖို႔အဆင္လဲ ေျပေစေအာင္ေပါ႔။ ဟိုစပ္စပ္ သည္စပ္စပ္ေလးေတြစုျပီး ေရးထား တာျဖစ္တဲ႔အျပင္ အလြယ္ျဖစ္ေအာင္ေရးထားလို႔ အေသးစိတ္ လိုအပ္တဲ႔အခ်က္ေတြ ရွိေနဦးမွာျဖစ္ပါတယ္။ Tips ေလးေတြ သေဘာအေနနဲ႔ပဲ ကြ်န္ေတာ္ေရးလိုက္ရပါတယ္။
အစားအေသာက္ ပံုေတြကိုရိုက္တဲ႔အခါမွာ အေကာင္းဆံုး အလင္းေရာင္ ေပးစနစ္ကေတာ႔ သဘာ၀ အလင္းေရာင္ျဖစ္ပါတယ္။ သဘာ၀အလင္းေရာင္ တိုက္ရိုက္က်ေနတဲ႔ ေနရာမွာ ရိုက္ရင္ ပံုထြက္ေတြဟာ ပိုျပီးသဘာ၀ဆန္တယ္လို႔ ေျပာၾကပါတယ္။ အထူးသျဖင္႔ ျပတင္းေပါက္ နဲ႔နီးတဲ႔ေနရာမွာ ရိုက္သင္႔ပါတယ္။ ျပတင္းေပါက္ကေန က်ေနတဲ႔အလင္း အထူးသျဖင္႔ မနက္ခင္းအလင္းေရာင္ဟာ စူးရွလို႔ မနက္ခင္း အလင္းေရာင္နဲ႔ဆို ပံုေလးေတြ ပိုလွေနတတ္ပါတယ္။ တျခားနည္းလမ္းတစ္ခုအရ Flash ေတြကို Bounced off လုပ္ျပီးရိုက္မယ္ဆိုလဲ ပံုထြက္ေကာင္းတယ္လိုဆိုုပါတယ္။ အစားအေသာက္အေပၚ ကိုက်ေနတဲ႔အလင္းဟာ ၄၅ ဒီဂရီေလာက္ ေစာင္းက်ေနတာမ်ိဳး ဆိုေကာင္းမယ္လို႔လဲ ေျပာထားတာေတြ႔ရပါတယ္။ အစားအေသာက္ပံုေတြ ကိုရိုက္တဲ႔အခါဆိုရင္ျဖင္႔ ေရျပင္ညီ နဲ႔အညီရိုက္တာရွိသလို ေနာက္တစ္မ်ိဳးက ေရျပင္ညီ ရဲ႔အထက္ အေပၚအနည္းငယ္ကေန ရိုက္သင္႔တယ္လို႔လဲ အၾကံေပးထားတာ ကြ်န္ေတာ္ဖတ္ရပါတယ္။ ဘာအတြက္လဲဆိုေတာ႔ ပံုထဲမွာ အစားအေသာက္အရိပ္ေလးလဲပါလာေတာ႔ အျမင္တစ္မ်ိဳးျဖစ္တာေပါ႔ခင္ဗ်ာ။
ကင္မရာ အေသးေလးေတြနဲ႔ Flash ထည္႔ရိုက္တဲ႔အခါမွာ ပံုေတြဟာ ျဖဴေဖြးထြက္လာတာေတြ။ အေသးစိတ္မျဖစ္တာေတြ ၀ါးေနတာေတြရွိတတ္ၾကပါတယ္။ ဖလက္ခ်္ကို ဒဲ႔ခ်ိန္ျပီးရိုက္လိုက္တဲ႔အတြက္ ျဖဴေဖြးထြက္သြားေကာ။ ကင္မရာမွာဖလက္ခ်္က တပ္ထားတာ ဒဲ႔မခ်ိန္လို႔ျဖစ္လိုလုပ္မလဲဆို .မဟုတ္ဘူးခင္ဗ် ကြ်န္ေတာ္ဆိုလိုခ်င္တာက တည္႔တည္႔ရိုက္တာပါပဲ ဒါေပမယ္႔ တစ္္ရွဴးအျဖဴစ ခပ္ပါးပါးေလးကို ဖလက္ခ်္ေရွ႔မွာ ခံျပီးေတာရိုက္ၾကည္႔ပါ အစားအေသာက္ေတြ အေပၚအလင္းေရာင ္ဖ်ာက်တာ ပိုလွလို႔ ပံုထြက္ေလးေတြ ေကာင္းလာမွာပါ။ ကြ်န္ေတာ္႔သူငယ္ခ်င္း တစ္ေယာက္ကေတာ႔ ဓာတ္မီးအျဖဴ ကိုတစ္ရွဴး စ ေလးခံျပီး မီးအေနနဲ႔ထပ္ေပးျပီး ရိုက္တယ္ခင္ဗ် ေန ည ခြဲျခားသတ္မွတ္ထားတာမရွိပါဘူး။ လိုအပ္တယ္လို႔ ခံစားမိလို႔ ေန႔လည္ ဘက္ရိုက္လဲျဖစ္တာပါပဲ။ တစ္ရွဴးရဲ႔ အနီးအေ၀းအကြာအေ၀း ေပၚမူတည္ျပီး အလင္းဖ်ာမွဳ႔ ဟာ ေျပာင္းလဲလာမွာပါ.။ စားပြဲတင္ စာၾကည္႔မီး ကိုအသံုးျပဳျပီးလဲရိုက္လို႔ရပါတယ္။ကြ်န္ေတာ္ စားပြဲတင္မီး ကိုအသံုျပဳျပီး ပံုေတြအမ်ားၾကီးရိုက္ၾကည္႔ခဲ႔ဘူးပါတယ္။ စိတ္ၾကိဳက္လဲျဖစ္ပါတယ္။ ကင္မရာနဲ႔ ညဘက္ေတြ ရိုက္တဲ႔အခါမွာ ပံုေတြ၀ါးေနတာေတြ ရွိတတ္ပါတယ္။ ေနာက္ လူျဖစ္ေစ ဘယ္အရာမဆို ႏွစ္ထပ္ျဖစ္ေနတာတို႔ မၾကည္လင္ မျပတ္သား တာတို႔ရွိၾကပါတယ္။ ဘာလို႔ အဲ႔လိုျဖစ္ရပါသလဲ ? ကြ်န္ေတာ္တုိ႔လက္ေတြက လွဳပ္ေနလို႔ပါ။ သည္ဟာကို လတ္တေလာ နည္းလမ္း၂ခုနဲ႔ ေျဖရွင္းလို႔ရပါတယ္။ ပထမတစ္နည္းက ထြိဳင္ေပါ႔ ဆိုတဲ႔ သံုးေခ်ာင္းေထာက္ ကိုသံုးတာပါပဲ။ သံုးေခ်ာင္းေထာက္ဟာ အေသးေလးေတြလဲရွိပါတယ္။ လက္ကိုင္ ဖုန္းအရြယ္သာသာေလးေတြပါ။ သယ္ရလြယ္ပါတယ္။ ေနာက္ဒုတိယနည္းက ကင္မရာအေတာ္မ်ားမ်ားမွာပါတဲ႔ ISO Setting ဆိုတာရွိပါတယ္။ အဲ႔သည္႔ ISO Setting ကို တင္ရိုက္ေပးပါ။ တင္ရိုက္တယ္ဆိုတာက 100 ကေန 200, 300, 400,800 ,1600 စသည္ျဖင္႔ပါ။ သည္ေနရရာမွာ သတိထားရမယ္႔ အခ်က္တစ္ခုက ISO တင္လာတာနဲ႔အမွ် Noise ဆိုတဲ႔ျဗဳပ္ေတြ ထလာတတ္ပါတယ္။ သတိျပဳရပါမယ္။ကြ်န္ေတာ္တို႔ လက္ေတြမွာ သတိမထားမိတဲ႔ လွဳပ္ခပ္မွဳ႔ေလးေတြရွိပါတယ္။ လက္ကိုဘယ္လိုပဲျငိမ္ေအာင္ကိုင္ထားထား ပံုထဲမွာ လွဳပ္သြားတယ္ လို႔ေျပာၾကပါတယ္။ အဲသည္ဟာက ေတာ႔ လက္ကိုဘယ္ေလာက္ ျငိမ္ေအာင္ထားထား ခလုပ္ ကိုႏွိပ္လိုက္တဲ႔ အခ်ိန္မွာ လွဳပ္သြားတာကိုး။ ဒါေၾကာင္႔မို႔ သံုးေခ်ာင္းေထာက္သံုးရင္ပဲျဖစ္ျဖစ္၊ သည္အတိုင္းလက္လြတ္ အစားအေသာက္ေတြကိုရိုက္ရင္ပဲျဖစ္ျဖစ္ Salf-timer 2 sec 5 sec စသည္ျဖင္႔ေပးျပီး ၇ိုက္ၾကည္႔ေပးပါ။ထူးျခားလာတာေတြ႔ရပါလိမ္႔မယ္။
NaingHL


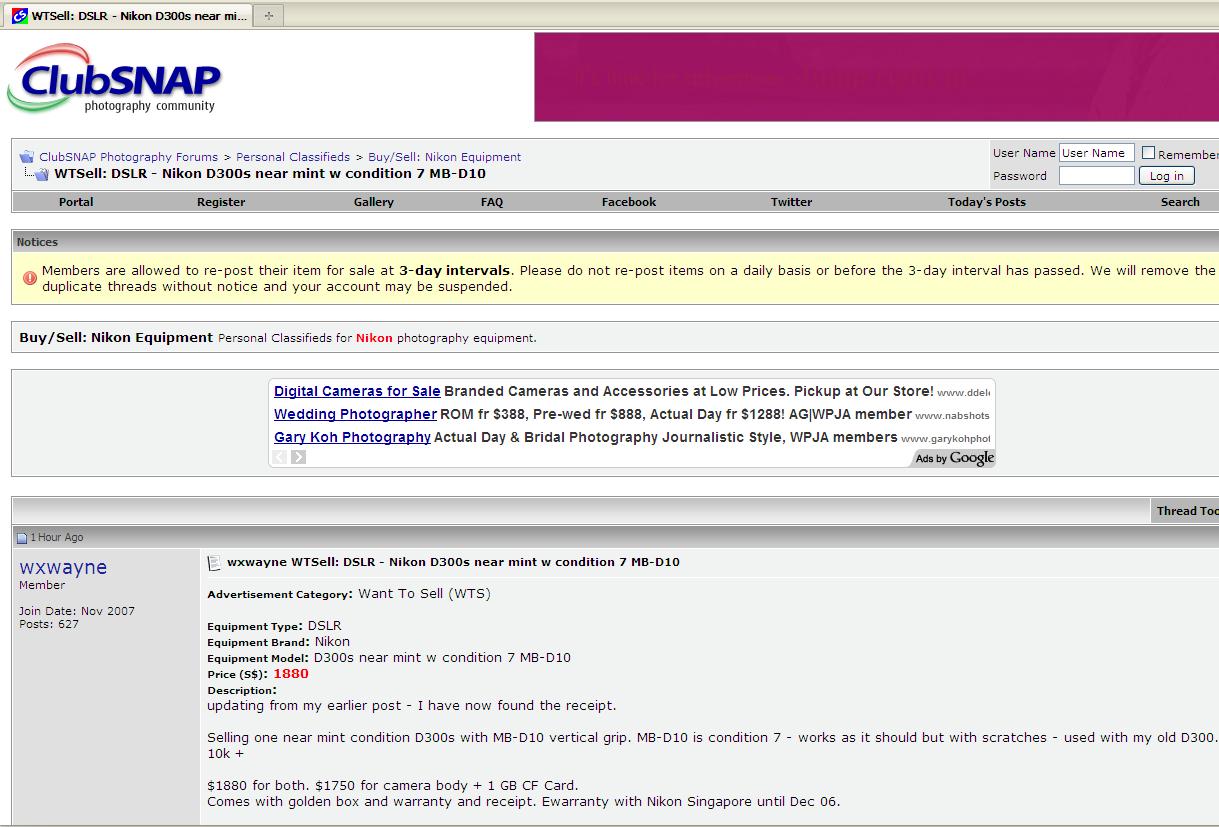

 ဆိုနီက သူတို႔ေမာ္ဒယ္အသစ္အတြက္ ေအာက္မွာျပထားတဲ႔အတိုင္းေျပာျပထားပါတယ္။
 We've heard Sony use the term "Advanced Model" when dealing with concepts before, and it seems that it's using said code once more to disguise what may end up being the A77. Rumors have been flaring over the past few weeks, noting that this particular Alpha DSLR would be showcased at Photokina before being officially unveiled at CES 2011. Few details were given, but we're able to tell that it'll shoot HD video in AVCHD and will be compatible with a vertical grip. Moreover, it'll ship with a translucent mirror (as found in the A55 and A33) and an Exmor APS HD CMOS sensor. At the company's Photokina press conference, an executive noted that the cam will be "far more powerful than the a55," and that it'll be aimed at "serious enthusiast photographers."
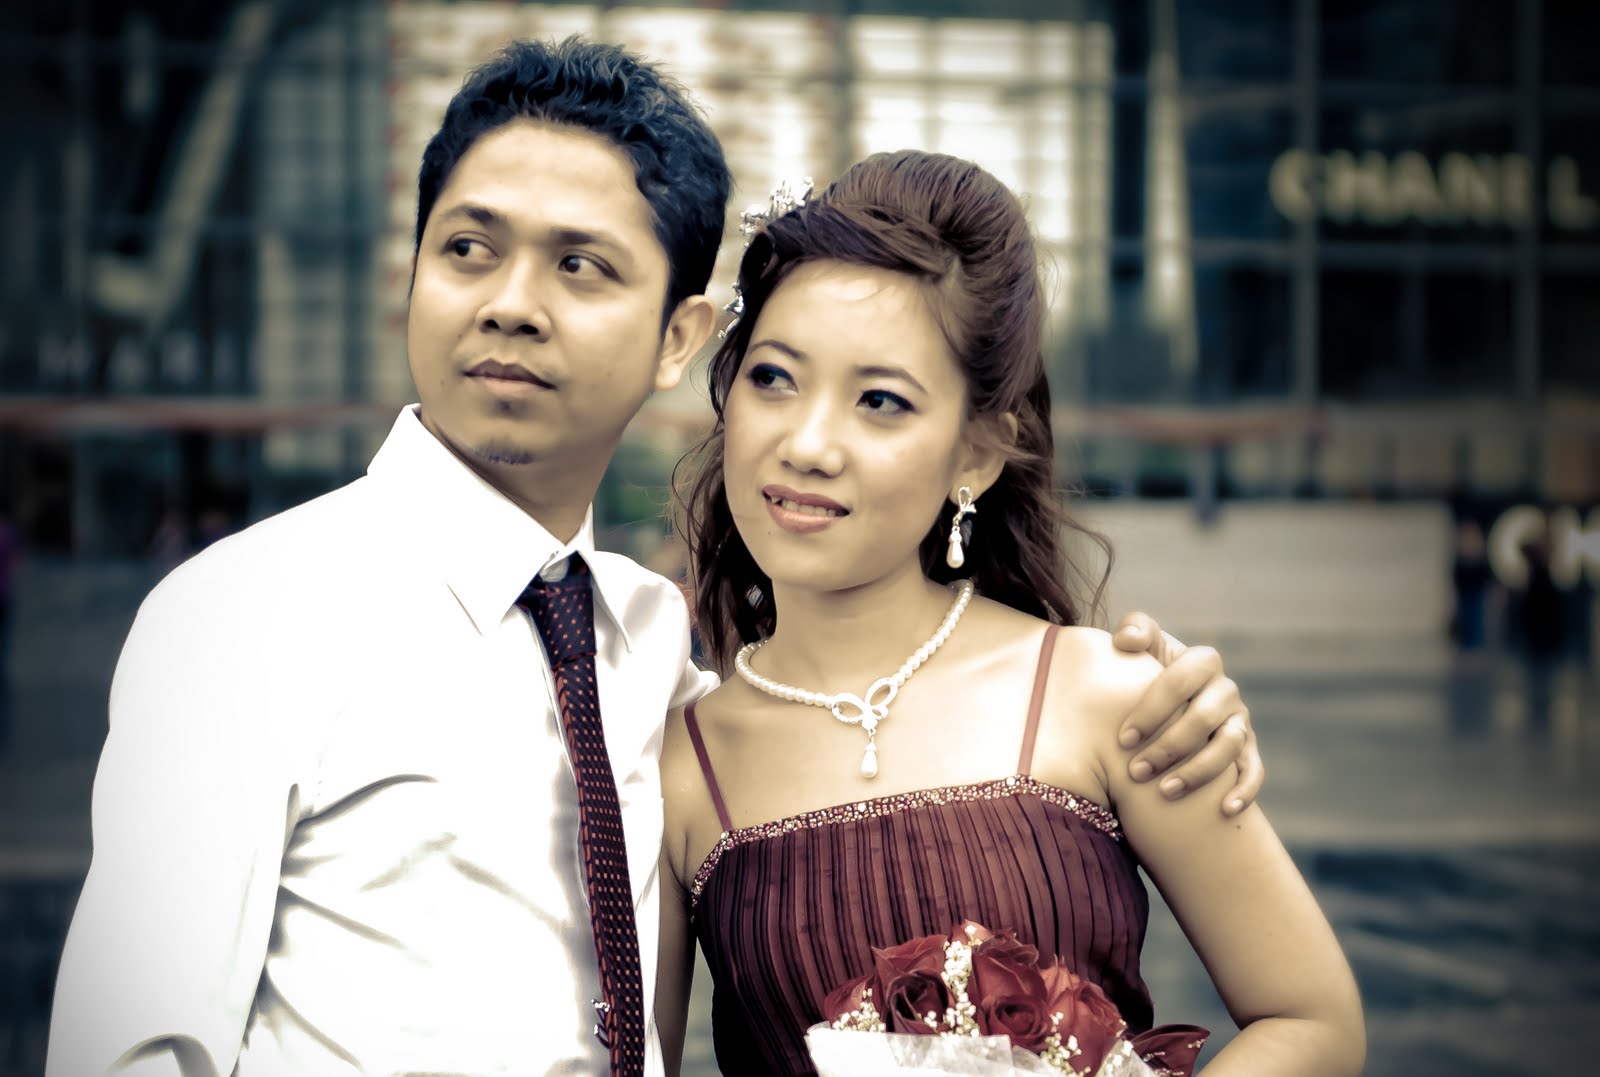
 ကြ်န္ေတာ္တစ္ေယာက္ ဟိုသြားလိုက္သည္သြားလိုက္နဲ႔ ဟိုက ဟာေဒါင္းလိုက္ သည္က ဟာေဒါင္းလိုက္ အခုသည္ဟာကေတာ႔ အမ်ိဳးသမီးအလွပံု အတြက္ Poses ေတြျဖစ္ပါတယ္။ ေလ႔လာၾကည္႔ေပးပါ။ အထူးသျဖင္႔ ပခံုး လက္ျပင္ ခါး .. လက္ဖမိုး နဲ႔ ေျခေထာက္ အေနအထားေတြက ကြ်န္ေတာ္တို႔သတိျပဳရမယ္႔အရာေတြပါပဲ။

| |
Clearly, it's a lottery game to determine when the operator is going to let off the next one, and it's not even worth shooting when he lets them off back to back (unless you like the abstract/artsie look). Except for those situations, I'll shoot every moment of a one-hour fireworks display and be lucky if I come up with five good shots. And if there's a strong wind—forget it. Similarly, the smoke can become a visual eyesore if there isn't enough circulation to cycle it out during the performance.
I always try to compose fireworks to have some sort of foreground (the people watching them, nearby buildings or landscape). As you know, fireworks involve bursts, flashes, and streaks, which are all over the map for making good exposures. Getting an "even" look involves timing. And that is governed by your noticing how the fireworks are spaced apart from one another.
What is low key lighting? According to Wikipedia, it attempts to create a chiaroscuro effect. In traditional photographic lighting, three-point lighting uses a key light, a fill light, and a back light for even illumination. Low-key lighting requires only one key light, optionally controlled with a fill light or a simple reflector. This type of setup is usually shot against a dark background.
The image above of my oldest daughter was taken using a single light inside a very large soft box that was positioned directly to one side and approximately 2 feet away from her.
See diagram:

Generally speaking, this is a less ‘forgiving’ lighting setup than other options in two different ways.
Therefore, this is lighting best reserved for the very young, those with flawless skin or ruggedly good looking men where you want to emphasize their facial ‘character’.
However, that last drawback can be overcome if:
This image is a good example of the natural drama of this type of lighting and the unexpected scenarios you can use it in.
 I used one light and a reflector for the shot above. The key light was placed to one side and slightly in front of the subjects. The reflector was positioned on the opposite side to bounce light back onto the subjects. Whereas the first photograph of my daughter was against seamless black paper, this one was shot against a dark cloth backdrop. The side lighting emphasizes the texture in the background to nice effect. If I had not used a reflector opposite the key light, the young man’s face would have been completely in dark shadow with no visible expression.


